Let's generate AI images in our likeness.
As a startup with remote team members, we don't get many chances to meet in person. This makes it difficult to take professional team photos for our website and marketing materials. I tried using Midjourney to generate AI images by giving it a few base images to copy the style from, but the results were not very good. Companies like Midjourney and OpenAI have put protections in place to prevent misuse of their technology, such as copyright infringement and deepfakes.
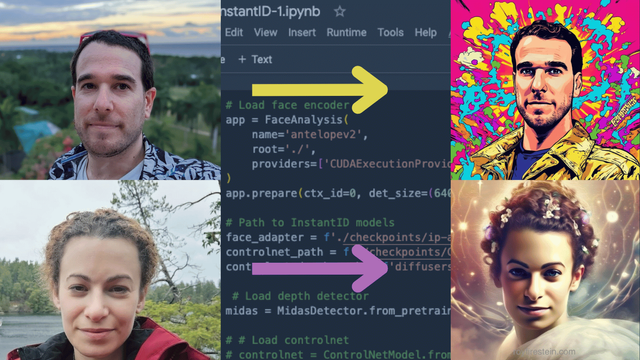
As a self-proclaimed hacker, I knew I can use open-source tools and public research to achieve my goals. I found a paper called InstantID: Identity Preserving Zero-Shot Image Generation which describes a method to generate AI images in the likeness of a person. This method uses a diffusion-based model, similar to OpenAI's DALL-E, to generate images from a text prompt. Specifically, we'll use the SDXL model from Stability.ai.
Hardware Requirements
Before we begin, we'll need a powerful computer with a great GPU. THe ideal specifications are:
- 1x NVIDIA A100 GPU
- 60+ GB of RAM
- 200 GB of SSD storage
Don't worry, I don't have this hardware either. We can use Google Colab, which lets us run AI models on professional-grade hardware. Unfortunately, our system requirements exceed the free tier of Google Colab, so we'll need to pay for the Colab Pro subscription. The cost is $10 per month, which is a small price to pay for the power we'll get.
Getting Started
Log in to your Google Colab account and create a new notebook.
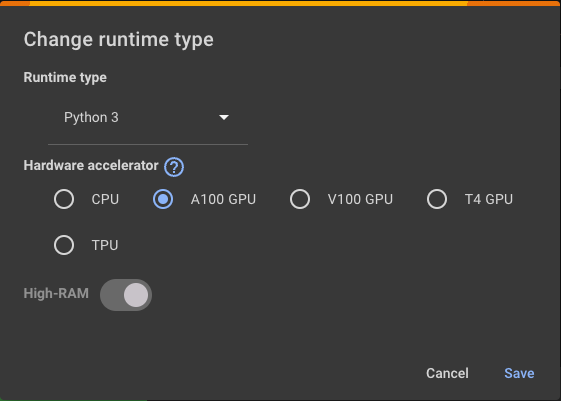
First, select the correct hardware profile in the notebook settings. Click on the "Runtime" menu, then "Change runtime type". Then select "A100 GPU" as the hardware accelerator. Also, make sure to toggle on the "High-RAM" option.
In the notebook, we'll need to upload some assets for the model to use. You can find a zip file with the assets here.
The assets include a face embedding model, the ControlNet, and the Image Prompt-adapter.
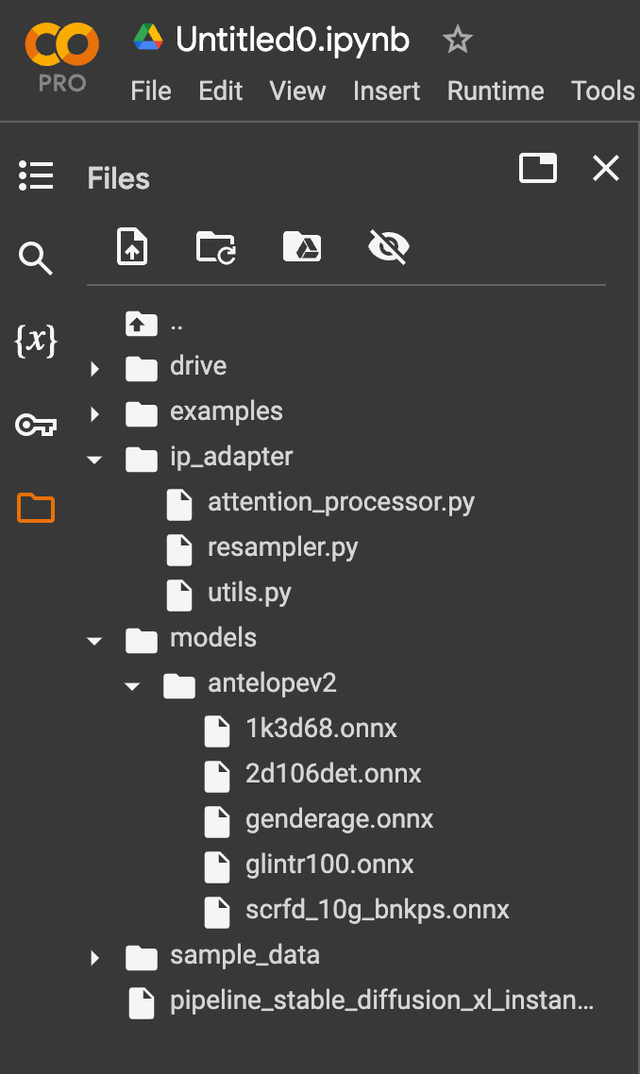
Extract the zip file and upload the files to your Google Colab notebook. The folder structure should look like this:
ip_adapter/
    attention_processor.py
    resampler.py
    utils.py
models/
    antelopev2/
        1k3d68.onnx
        2d106det.onnx
        genderage.onnx
        glitr100k.onnx
        scrfd_10g_bnkps.onnx
pipeline_stable_diffusion_xl_instantid.py
Now that we have the assets and the correct runtime, we can start writing the code.
We begin by downloading the InstantID model from the Hugging Face Hub.
The files will be saved to the checkpoints directory.
from huggingface_hub import hf_hub_download
hf_hub_download(repo_id="InstantX/InstantID", filename="ControlNetModel/config.json", local_dir="./checkpoints")
hf_hub_download(repo_id="InstantX/InstantID", filename="ControlNetModel/diffusion_pytorch_model.safetensors", local_dir="./checkpoints")
hf_hub_download(repo_id="InstantX/InstantID", filename="ip-adapter.bin", local_dir="./checkpoints")
Next, we'll install the required Python packages.
!pip install opencv-python transformers accelerate onnxruntime onnxruntime-gpu insightface diffusers pillow controlnet-aux
In the next cell we will load the necessary python libraries and helper functions.
import cv2
import torch
import numpy as np
from PIL import Image
from diffusers.utils import load_image
from diffusers.models import ControlNetModel
from diffusers.pipelines.controlnet.multicontrolnet import MultiControlNetModel
from insightface.app import FaceAnalysis
from pipeline_stable_diffusion_xl_instantid import StableDiffusionXLInstantIDPipeline, draw_kps

# Helper function to resize the image
def resize_img(input_image, max_side=1280, min_side=1024, size=None,
               pad_to_max_side=False, mode=Image.BILINEAR, base_pixel_number=64):

    w, h = input_image.size
    if size is not None:
        w_resize_new, h_resize_new = size
    else:
        ratio = min_side / min(h, w)
        w, h = round(ratio*w), round(ratio*h)
        ratio = max_side / max(h, w)
        input_image = input_image.resize([round(ratio*w), round(ratio*h)], mode)
        w_resize_new = (round(ratio * w) // base_pixel_number) * base_pixel_number
        h_resize_new = (round(ratio * h) // base_pixel_number) * base_pixel_number
    input_image = input_image.resize([w_resize_new, h_resize_new], mode)

    if pad_to_max_side:
        res = np.ones([max_side, max_side, 3], dtype=np.uint8) * 255
        offset_x = (max_side - w_resize_new) // 2
        offset_y = (max_side - h_resize_new) // 2
        res[offset_y:offset_y+h_resize_new, offset_x:offset_x+w_resize_new] = np.array(input_image)
        input_image = Image.fromarray(res)
    return input_image
Next, we prepare the models and network.
# Load face encoder
app = FaceAnalysis(
    name='antelopev2',
    root='./',
    providers=['CUDAExecutionProvider', 'CPUExecutionProvider']
)
app.prepare(ctx_id=0, det_size=(640, 640))

# Path to InstantID models
face_adapter = f'./checkpoints/ip-adapter.bin'
controlnet_path = f'./checkpoints/ControlNetModel'
controlnet_depth_path = f'diffusers/controlnet-depth-sdxl-1.0-small'

# Load controlnet
controlnet = ControlNetModel.from_pretrained(controlnet_path, torch_dtype=torch.float16)

# Base model from Stability.ai
base_model_path = 'stabilityai/stable-diffusion-xl-base-1.0'

# Create pipeline
pipe = StableDiffusionXLInstantIDPipeline.from_pretrained(
    base_model_path,
    controlnet=controlnet,
    torch_dtype=torch.float16,
)

# enable GPU offloading
pipe.cuda()

# load the image-prompt adapter
pipe.load_ip_adapter_instantid(face_adapter)
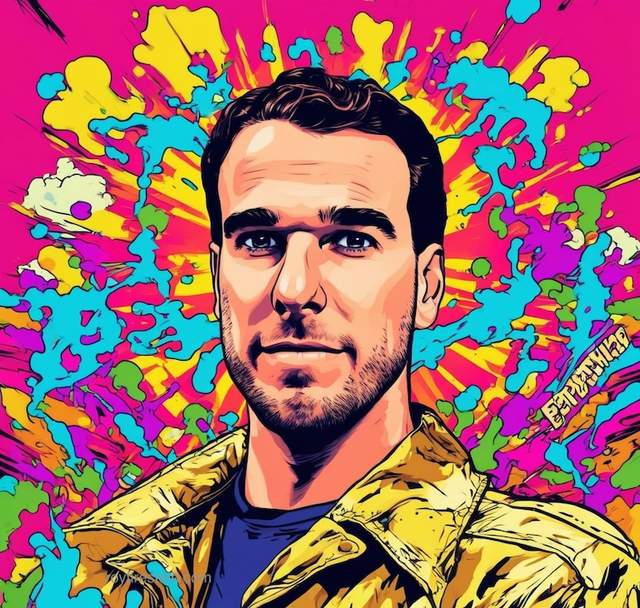
Okay, we're ready to generate our first image. Let's load an image of ourselves and generate an AI image in our likeness.
# load an image
face_image = load_image("./examples/roy-1.jpg")

# resize the image
face_image = resize_img(face_image)
The model can't read bits and bytes of computer data, so we need to covert the image to something that the model can understand. This process is called embedding, and it's a way to represent the image as a set of numbers. Large Language Models (LLMs) like GPT-4 and DALL-E use embeddings to understand and generate text and images.
# prepare face embeddings
face_info = app.get(cv2.cvtColor(np.array(face_image), cv2.COLOR_RGB2BGR))

# only use the maximum face
face_info = sorted(face_info, key=lambda x:(x['bbox'][2]-x['bbox'][0])*x['bbox'][3]-x['bbox'][1])[-1]
face_emb = face_info['embedding']
face_kps = draw_kps(face_image, face_info['kps'])
Now we create the prompt for the model to generate the image.
prompt = " ".join([
    "comic portrait of a man.",
    "graphic illustration, comic art, graphic novel art, vibrant, highly detailed",
])

negative_prompt = " ".join([
    "photograph, deformed, glitch, noisy, realistic",
    "stock photo, black and white"
])
The negative prompt is used to guide the model away from generating images that are too realistic.
Finally, we generate the image.
# generate image
image = pipe(
    prompt=prompt,
    negative_prompt=negative_prompt,
    image_embeds=face_emb,
    image=face_kps,
    controlnet_conditioning_scale=0.8,
    ip_adapter_scale=0.8,
    num_inference_steps=30,
    guidance_scale=5,
).images[0]

# save the result
image.save('result.jpg')
Here's the result:
Examples from the research paper:

You can find a copy of this notebook here.
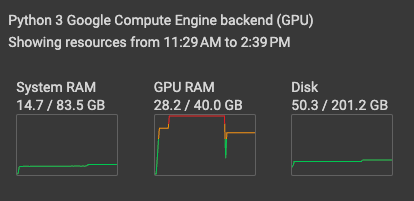
The resource utilization on the Google Colab Pro instance is not insignificant:
Conclusion
The technology can be used for a variety of purposes, some are exciting and some are scary. Tools are not inherently good or bad, it's how they are used that matters. As humans, we like to explore and push the boundaries of what's possible. Some of us will try to abuse the technology, while others will create counter-measures to protect or detect abuse.
Here are some other use cases for the technology:
- Synthetic photos of identification documents (driver's license, passport, etc.)
- Fake profile pictures for social media
- Generate images for marketing materials
- Create custom avatars for video games