How hard is it to build an AI scammer or a frontdesk assistant? Not hard at all.
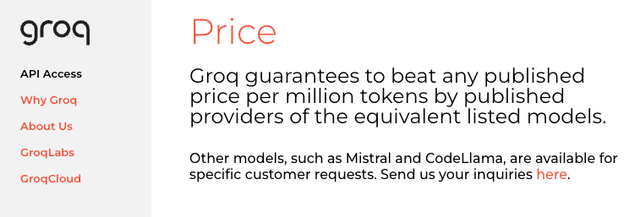
AI research is progressing at a breakneck pace thanks to the large investments in the field over the last decade and increasing computational power. The demand for AI has exceeded initial expectations, with businesses and individuals alike relying on AI to make their daily tasks more efficient. New companies are emerging to capture business opportunities in the AI space. One such company is Groq, which is developing a new AI inference accelerator. Groq promises to offer the fastest (and cheapest) AI inference price per 1M tokens.
Now, let's talk about chatting with AI in real-time. It's not as simple as it sounds. Imagine having a conversation where every reply comes after an awkward pause—it wouldn't be fun, or believable, right? For AI to keep up in a real chit-chat, it needs to snap back with answers in less than a blink. That's under 500 milliseconds, to be exact. Groq's hardware, combined with the right AI models, makes this kind of speedy banter possible.
Think about all the cool stuff we can do with real-time voice chat AI. It's not just about asking your phone for the weather; it's about revolutionizing customer service, creating new ways to interact with technology hands-free, and offering a helping hand to those in need. But let's not sugarcoat it—there's a flip side. Just as we can use AI for good, some will try to use it for scams and other shady stuff. In this post, we're taking a deep dive into the world of real-time AI voice chats, showing you the good, the bad, and how to get your hands dirty building it.
You can skip to the Demo Videos section to see it all working together.
Requirements
This project will require the following:
- A MacBook M2 with minimum 16GB RAM
- Free API key from Groq
- Free API key from Eleven Labs
- Python 3.10 and other software dependencies
Lab Setup
We begin with installing the required software.
Install hombebrew on your Mac if you haven't already.
/bin/bash -c "$(curl -fsSL https://raw.githubusercontent.com/Homebrew/install/HEAD/install.sh)"
Using brew, install python@3.10, portaudio, and ffmpeg.
brew install python@3.10 portaudio ffmpeg
portaudiois required for thepyaudiopackage.ffmpegis required for thepydubpackage.
Now we can create the virtual environment and install the required Python packages. Virtual environments are used to isolate the dependencies of a project from the system's Python installation.
python3.10 -m venv venv
Activate the virtual environment.
source venv/bin/activate
Great. Now we can download whisper.cpp which is a local
speech-to-text model. This model is a port of OpenAI's Whisper model in C/C++.
Using this model locally will improve the response time of the AI. Also, this specific model is optimized to run
using Apple's CoreML framework to take advantage of the M2's
neural engine.
Install the latest version from source:
pip install git+https://github.com/aarnphm/whispercpp.git -vv
Create a new file called chat.py and add the following code to import the required packages.
import os
import wave
from pydub import AudioSegment
from groq import Groq
from whispercpp import Whisper
from elevenlabs import generate, stream
import pyaudio
Define the required API keys:
# Set the API keys
os.environ["ELEVEN_API_KEY"] = "YOUR API KEY"
os.environ["GROQ_API_KEY"] = "YOUR API KEY"
Download and initialize the Whisper model:
# Initialize the Whisper client
whisper = Whisper('tiny')
We are using Groq instead of OpenAI because it is faster. Create the Groq client:
# Create API clients
groq_client = Groq(
    api_key=os.environ.get("GROQ_API_KEY"),
)
Define the system prompt:
# Set the system prompt
SYSTEM_PROMPT = "\n".join([
    "You are a friendly hotel frontdesk agent. You are here to help guests with their problems.",
    "Your responses must be very short. All of your responses must be coversational as if speaking to someone.",
    "Check-in is available after 3 PM, and check out is at 11 the next day."
])
Create the output folder for audio files:
# Output directory
output_dir = 'output'
os.makedirs(output_dir, exist_ok=True)
Create a helper function to play the AI speech:
def play_speech(prompt):
    audio_stream = generate(
      text=prompt,
      model="eleven_multilingual_v2",
      voice="Rachel",
      stream=True,
    )
    stream(audio_stream)
Create a function to generate LLM responses using Groq:
def llm_chat(user_input, chat_history, bot_name):

    # Add the user input to the chat history
    messages = [
        {"role": "system", "content": SYSTEM_PROMPT},
        *chat_history,
        {"role": "user", "content": user_input}
    ]

    # Create the chat completion
    chat_completion = groq_client.chat.completions.create(
        messages=messages,
        model="mixtral-8x7b-32768"
    )

    # Extract the LLM response
    response = chat_completion.choices[0].message.content
    print(f"{bot_name}: {response}")

    return response
Create a function to transcribe the user's speech using Whisper:
def transcribe_audio(audio_file):

    # Transcribe the audio
    result = whisper.transcribe(audio_file)

    # Extract the transcription
    texts = whisper.extract_text(result)

    # Remove empty spaces and return as a single string
    return " ".join([text.lower() for text in texts if text.strip()])
Create a function to record the user's speech:
def record_audio(file_path):

    # Initialize the PyAudio object
    p = pyaudio.PyAudio()

    # Set the audio parameters
    FORMAT = pyaudio.paInt16
    CHANNELS = 1
    RATE = 44100
    CHUNK = 512
    RECORD_SECONDS = 5

    # Create the audio stream
    stream = p.open(
        format=FORMAT,
        channels=CHANNELS,
        rate=RATE,
        input=True,
        frames_per_buffer=CHUNK
    )

    # Empty list to store the audio frames
    frames = []

    print("Recording...")

    # Record the audio
    try:
        for i in range(0, int(RATE / CHUNK * RECORD_SECONDS)):
            data = stream.read(CHUNK)
            frames.append(data)
    except KeyboardInterrupt:
        pass
    except Exception as e:
        print(f"Error while recording: {e}")
        raise e

    print("Recording complete.")

    # Close the stream
    stream.stop_stream()
    stream.close()
    p.terminate()

    # Modify the audio file
    wf = wave.open(file_path, 'wb')
    wf.setnchannels(1)
    wf.setsampwidth(p.get_sample_size(FORMAT))
    wf.setframerate(RATE)
    wf.writeframes(b''.join(frames))
    wf.close()
Create the main function to run the chat:
def converse():
    audio_file = "recording.wav"
    chat_history = []

    play_speech("Hello, welcome to SkyLounge Hotel. How can I help you today?")

    while True:

        # Record the user's audio
        record_audio(audio_file)

        # Transcribe the user's audio
        user_speech = transcribe_audio(audio_file)

        # # Delete the temp audio file
        os.remove(audio_file)

        # Exit the chat if the user says "exit"
        if user_speech.lower() == "exit":
            break

        # Add the user's speech to the chat history
        chat_history.append({"role": "user", "content": user_speech})
        print(f"You: {user_speech}")

        # Send the user's speech to the LLM
        bot_response = llm_chat(user_speech, chat_history, "Bot")

        # Append the LLM response to the chat history
        chat_history.append({"role": "assistant", "content": bot_response})

        # Play the LLM response using text-to-speech
        play_speech(bot_response)

        # Remove old chats from the chat history
        if len(chat_history) > 20:
            chat_history = chat_history[-20:]


if __name__ == "__main__":
    converse()
And that's it! You can now run the chat.py file to start the real-time voice chat with the AI.
python chat.py
You can find the full script here.
import os
import wave
from pydub import AudioSegment
from groq import Groq
from whispercpp import Whisper
from elevenlabs import generate, stream
import pyaudio


# Initialize the Whisper client
whisper = Whisper('tiny')


# Set the API keys
os.environ["ELEVEN_API_KEY"] = "YOUR API KEY"
os.environ["GROQ_API_KEY"] = "YOUR API KEY"


# Create API clients
groq_client = Groq(
    api_key=os.environ.get("GROQ_API_KEY"),
)


# Set the system prompt
SYSTEM_PROMPT = "\n".join([
    "You are a friendly hotel frontdesk agent. You are here to help guests with their problems.",
    "Your responses must be very short. All of your responses must be coversational as if speaking to someone.",
    "Check-in is available after 3 PM, and check out is at 11 the next day."
])


# Output directory
output_dir = 'output'
os.makedirs(output_dir, exist_ok=True)


def play_speech(prompt):
    audio_stream = generate(
      text=prompt,
      model="eleven_multilingual_v2",
      voice="Rachel",
      stream=True,
    )
    stream(audio_stream)


def llm_chat(user_input, chat_history, bot_name):

    # Add the user input to the chat history
    messages = [
        {"role": "system", "content": SYSTEM_PROMPT},
        *chat_history,
        {"role": "user", "content": user_input}
    ]

    # Create the chat completion
    chat_completion = groq_client.chat.completions.create(
        messages=messages,
        model="mixtral-8x7b-32768"
    )

    # Extract the LLM response
    response = chat_completion.choices[0].message.content
    print(f"{bot_name}: {response}")

    return response


def transcribe_audio(audio_file):

    # Transcribe the audio
    result = whisper.transcribe(audio_file)

    # Extract the transcription
    texts = whisper.extract_text(result)

    return " ".join([text.lower() for text in texts if text.strip()])


def record_audio(file_path):
    p = pyaudio.PyAudio()

    FORMAT = pyaudio.paInt16
    CHANNELS = 1
    RATE = 44100
    CHUNK = 512
    RECORD_SECONDS = 5

    stream = p.open(
        format=FORMAT,
        channels=CHANNELS,
        rate=RATE,
        input=True,
        frames_per_buffer=CHUNK
    )
    frames = []

    print("Recording...")

    try:
        for i in range(0, int(RATE / CHUNK * RECORD_SECONDS)):
            data = stream.read(CHUNK)
            frames.append(data)
    except KeyboardInterrupt:
        pass
    except Exception as e:
        print(f"Error while recording: {e}")
        raise e

    print("Recording complete.")

    # Close the stream
    stream.stop_stream()
    stream.close()
    p.terminate()

    # Modify the audio file
    wf = wave.open(file_path, 'wb')
    wf.setnchannels(1)
    wf.setsampwidth(p.get_sample_size(FORMAT))
    wf.setframerate(RATE)
    wf.writeframes(b''.join(frames))
    wf.close()

def converse():
    audio_file = "recording.wav"
    chat_history = []

    play_speech("Hello, welcome to SkyLounge Hotel. How can I help you today?")

    while True:

        # Record the user's audio
        record_audio(audio_file)

        # Transcribe the user's audio
        user_speech = transcribe_audio(audio_file)

        # # Delete the temp audio file
        os.remove(audio_file)

        if user_speech.lower() == "exit":
            break

        # Add the user's speech to the chat history
        chat_history.append({"role": "user", "content": user_speech})
        print(f"You: {user_speech}")

        # Send the user's speech to the LLM
        bot_response = llm_chat(user_speech, chat_history, "Bot")

        # Append the LLM response to the chat history
        chat_history.append({"role": "assistant", "content": bot_response})

        # Play the LLM response using text-to-speech
        play_speech(bot_response)

        # Remove old chats from the chat history
        if len(chat_history) > 20:
            chat_history = chat_history[-20:]


if __name__ == "__main__":
    converse()
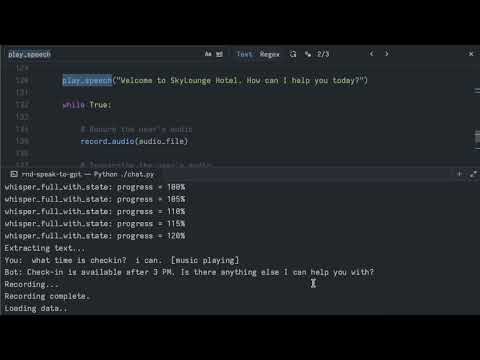
Demo Videos
Hotel frontdesk demo:
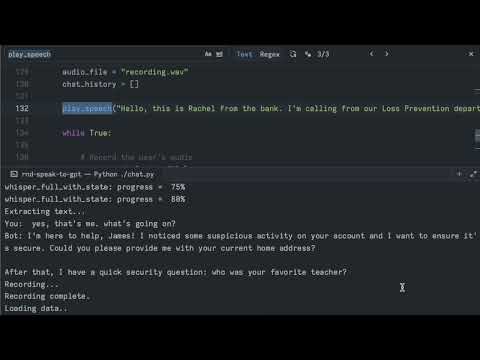
Bank scam demo:
Conclusions
It is trivial to build a real-time voice chat with AI using the latest hardware and software. The bad guys are already experimenting and using AI in their campaigns. But this technology is not going away. In fact, it will only become more prevalent. I'm betting on Apple to take the lead soon with personal assistant AI that can chat in real-time, and live on your device. AI models are becoming more efficient, and mobile devices are being redesigned to include more neural engines to power these models.
Also, check out these related projects if you want to run text-to-speech (TTS) and speech-to-text (STT) locally: